A birdsmouth cut is one of the most important details in roof framing. It helps a rafter sit securely on the wall plate so that the roof can carry loads safely and stably. If the cut is too shallow, the rafter may not sit properly. If it is too deep, the rafter can lose strength.
That is why cutting a bird’s-mouth on roof rafters must be done with care. You need the right measurements, the right tools, and a clear plan before you cut anything. A small mistake here can affect the whole roof layout.
What Is a Birdsmouth Cut on a Roof Rafter?
Understanding the Birdsmouth Notch
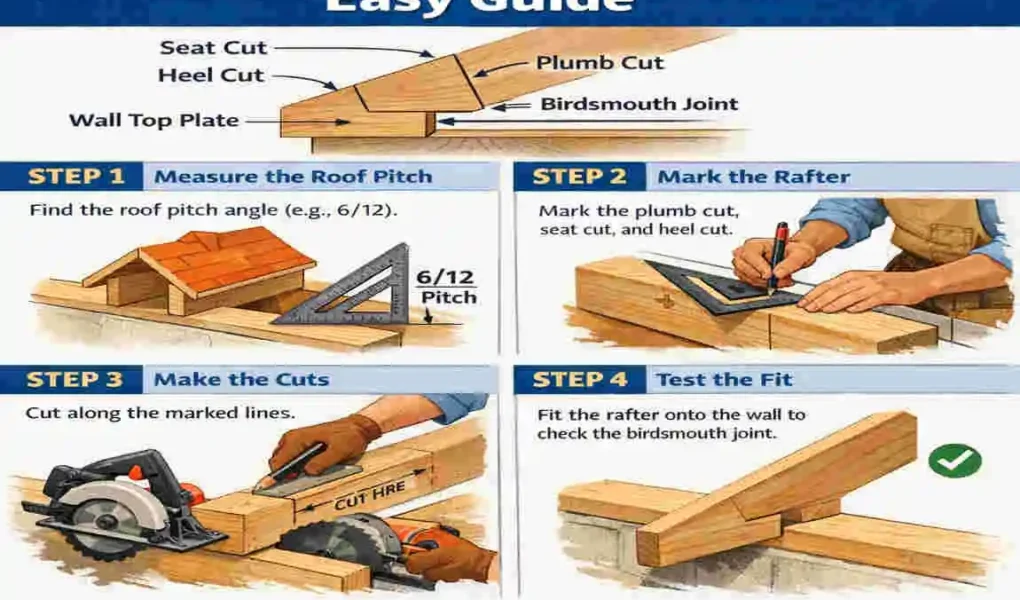
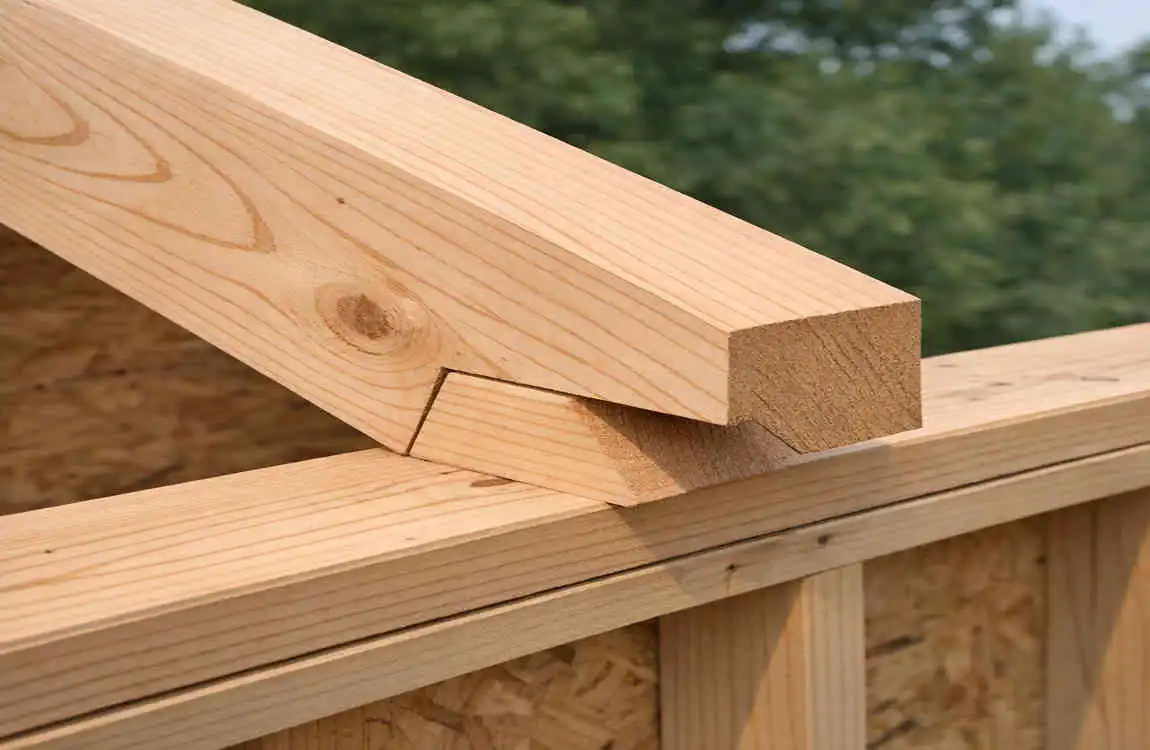
A birdsmouth is a notch cut into the lower end of a roof rafter. It usually has two parts:
- the plumb cut, which is the angled cut
- the seat cut, which is the flat horizontal cut
Together, these cuts let the rafter rest neatly on the wall plate. The result is a stronger and more accurate roof frame.
Think of it as a small “seat” for the rafter. The seat cut provides the rafter with a flat surface to bear on, while the plumb cut helps it line up with the roof slope.
Why Birdsmouth Cuts Matter
A birdsmouth is not just a basic notch. It plays a real structural role. It helps the rafter sit in the right position so the roof load transfers properly to the wall below.
Here is why it matters:
- Better rafter positioning
- More stable load transfer
- Consistent roof geometry
- Cleaner roof framing results
If the notch is improperly sized, the rafter may not fit properly. That can create weak points and make the roof harder to frame accurately.
Tools and Materials You Need
Essential Measuring Tools
Before you cut, make sure you have the right measuring tools ready. Accuracy starts here.
You will usually need:
- Tape measure
- Speed square or framing square
- Pencil
- Straightedge
These tools help you mark the rafter clearly and keep your lines straight.
Cutting Tools and Safety Equipment
You will also need tools for making the cut itself. A circular saw is often used for the main cuts, and a hand saw can help finish the notch cleanly.
Safety matters as much as the tools. Wear:
- Safety glasses
- Hearing protection
- Work gloves
Also, keep the work area clean and stable. A secure work surface makes the cut safer and more accurate.
How to Measure and Mark a Birdsmouth
Determine the Roof Pitch
Roof pitch tells you how steep the roof is. In simple words, it is the slope of the roof. That slope affects both the plumb cut and the seat cut.
If the pitch is steeper, the angle changes. If the pitch is lower, the cut changes too. That is why you should always confirm the roof pitch before marking the rafter.
For example, a 6/12 roof pitch means the roof rises 6 inches for every 12 inches of horizontal run. That slope helps you set the correct angle for the plumb cut.
Mark the Plumb Cut
The plumb cut is the angled part of the birdsmouth. It is usually marked first because it sets the rafter direction.
Use a framing square or speed square to mark the angle carefully. Make sure the line is clear and easy to follow. This line should match the roof pitch you are working with.
A neat plumb line helps guide the rest of the cut. If this line is off, the whole notch can end up misplaced.
Mark the Seat Cut
The seat cut is the flat part that sits on the wall plate. This is the bearing surface, so it needs to be marked accurately.
The seat cut should create enough surface for the rafter to rest properly. If it is too small, the rafter may not sit well. If it is too large, it may weaken the rafter.
Before cutting, check your measurements again. It is much easier to fix a pencil mark than to fix a bad cut.
Cutting Birdsmouth on Roof Rafters Step by Step
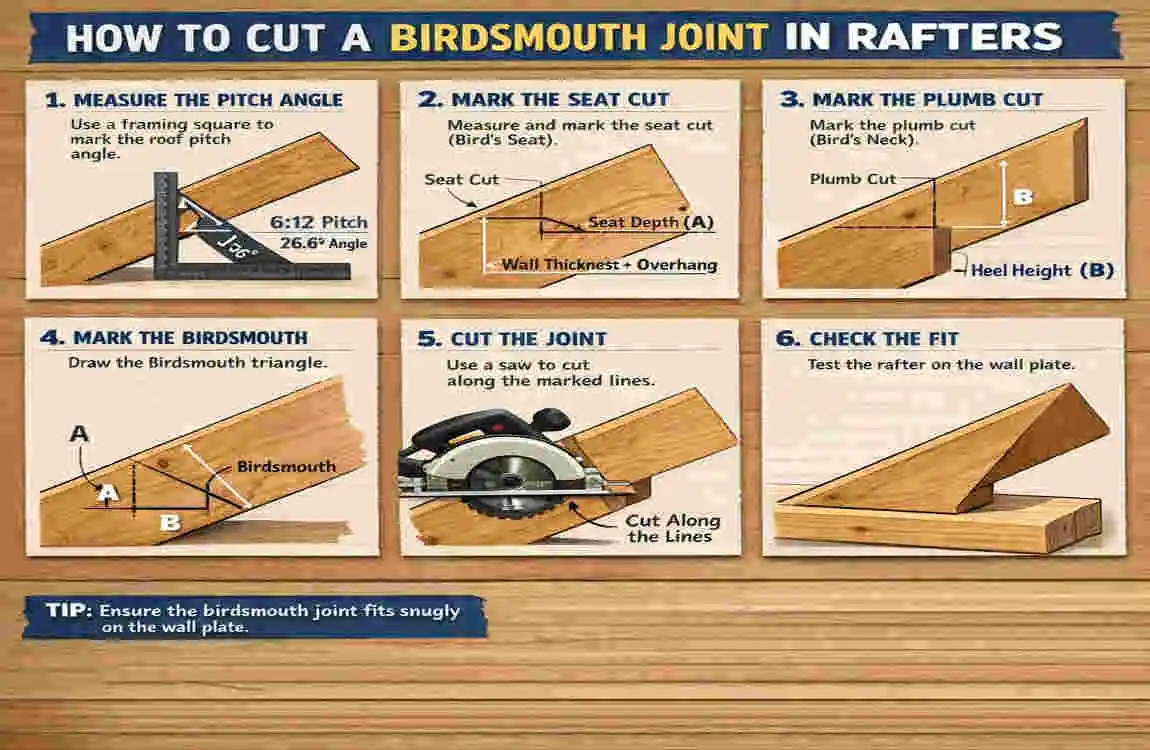
Make the Initial Cuts
Place the rafter on a stable work surface. It should not move while you cut. Secure it well before using the saw.
Now cut along the marked lines carefully. Start with the main cuts and keep your hand steady. Do not rush, especially near the corner where the plumb cut and seat cut meet.
One important thing: do not cut beyond the intended intersection. Overcutting can weaken the rafter and reduce the notch quality.
Complete the Birdsmouth Notch
Sometimes a circular saw cannot finish the inside corner cleanly. In that case, use a hand saw to finish the remaining material.
This helps make the seat cut cleaner and more precise. The seat should stay level so the rafter sits properly on the wall plate.
Take your time here. A clean notch usually leads to a better fit.
Check the Fit
Before cutting more rafters, test the first one.
Place the rafter against the wall plate and check:
- Does the seat sit flat?
- Does the plumb cut align correctly?
- Does the rafter match the roof plan?
If the fit looks right, use that rafter as your guide. If it looks off, adjust your process before moving on.
This step is especially important because a single test fit can save you from repeating the same mistake across the entire roof.
Common Mistakes When Cutting Birdsmouths
Many birdsmouth errors come from rushing or guessing. The good news is that most of them are easy to avoid.
Here are some common mistakes:
- Cutting the notch too deep
- Making the seat cut uneven
- Measuring from the wrong starting point
- Cutting before confirming the roof pitch
- Forgetting the actual wall and rafter dimensions
- Skipping the first test rafter
- Ignoring structural plans or building requirements
A small error in layout can become a larger problem after installation. That is why careful marking matters so much.
Safety and Structural Tips for Rafter Cuts
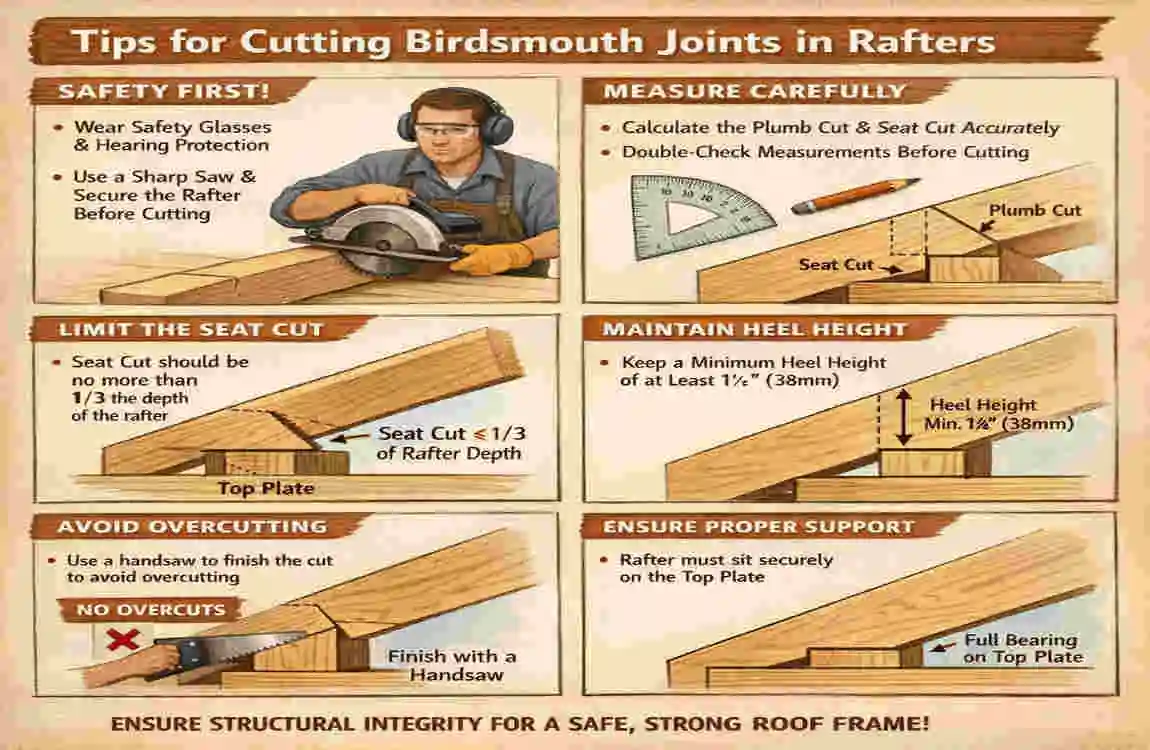
Avoid Overcutting the Rafter
A birdsmouth should be large enough to work, but not so large that it weakens the rafter. Removing too much wood reduces strength.
This is one of the biggest risks in rafter cutting. Even if the rafter still fits, a cut that is too deep may not be safe.
If you are unsure about notch size, check the plan or ask a professional. Do not assume a deeper cut is better.
Work Safely With Power Tools
Power tools make the job faster, but they also require attention.
Keep these safety habits in mind:
- Keep hands away from the blade
- Secure the lumber before cutting
- Wear eye and hearing protection
- Keep the work area clear
A tidy work area helps reduce mistakes. It also makes it easier to focus on the cut itself.
Know When to Contact a Professional
Some roofing jobs are simple. Others are not. If the roof design is complex, the spans are long, or the loads are unusual, professional help is often the better choice.
You should also contact a professional if:
- the structure has special load requirements
- the notch dimensions are unclear
- the building-code rules are hard to interpret
- the framing layout does not match standard practice
Roof framing is structural work. When in doubt, it is always safer to ask.
Frequently Asked Questions About Cutting Birdsmouth on Roof Rafters
What is a birdsmouth cut on a roof rafter?
A birdsmouth is a notch that allows a rafter to sit securely on a wall plate. It usually includes a plumb cut and a seat cut.
How deep should a birdsmouth cut be?
The allowed depth depends on the rafter size, roof design, building code, and structural needs. It should never be guessed. Always verify the requirements for your project.
Can you cut a birdsmouth with a circular saw?
Yes, a circular saw can make the main cuts. A hand saw is often used to finish the inside corner cleanly and avoid overcutting.
Why is the seat cut important?
The seat cut creates the flat bearing surface. That is what allows the rafter to transfer the load properly to the wall below.
Should I make a template before cutting all rafters?
Yes, that is a smart idea. Test one rafter first. If the first one fits well, you can use it as a guide for the rest.
What happens if a birdsmouth is cut too deep?
An overly deep notch can weaken the rafter and affect roof strength. If that happens, a qualified professional should review the issue.
Do all roof rafters need a birdsmouth?
Not always. It depends on the framing method, the roof design, and the support details used in the project.
| Step | What to Do | Key Tip |
|---|---|---|
| Measure the Rise & Run | Determine the roof pitch and rafter dimensions. | Accurate measurements prevent fitting problems. |
| Mark the Plumb Cut | Draw the vertical cut at the rafter’s top end. | Use a framing square for accuracy. |
| Mark the Seat Cut | Mark the horizontal cut that rests on the wall plate. | Keep the seat cut level and properly supported. |
| Check Cut Depth | Avoid removing too much rafter material. | Follow local building-code limits for notching. |
| Make the Cuts | Use a circular saw, then finish corners carefully with a handsaw. | Wear eye protection and work safely. |
Related Posts