Have you noticed how many homes in your neighborhood are trading in their old asphalt shingles for sleek, shiny metal roofs? You are not imagining things! Metal roofing has exploded in popularity as homeowners seek energy-efficient, long-lasting, and stylish solutions that stand up to Mother Nature.
Here is the really exciting part: learning how to attach metal roofing panels yourself can save you thousands of dollars. Professional installation typically costs between $8 and $16 per square foot, which means a 2,000-square-foot roof can quickly rack up a $20,000+ bill. By taking on this project yourself, you can slash that cost by 40% to 60%, keeping more money in your pocket for other home improvements.
Beyond the savings, metal roofs offer incredible benefits. We are talking about a lifespan of 40 to 70 years, compared to the measly 15 to 20 years you get from traditional shingles. Metal roofs also reflect solar heat, reducing summer cooling costs by up to 25%. They are fire-resistant, eco-friendly, and come in dozens of styles and colors to match any home aesthetic.
Now, we will be honest with you: installing a metal roof is not a walk in the park. It takes patience, precision, and a healthy respect for heights. But with the right guidance, the right tools, and a weekend or two of hard work, you can absolutely pull this off.
| Step | Action | Key Tips |
|---|---|---|
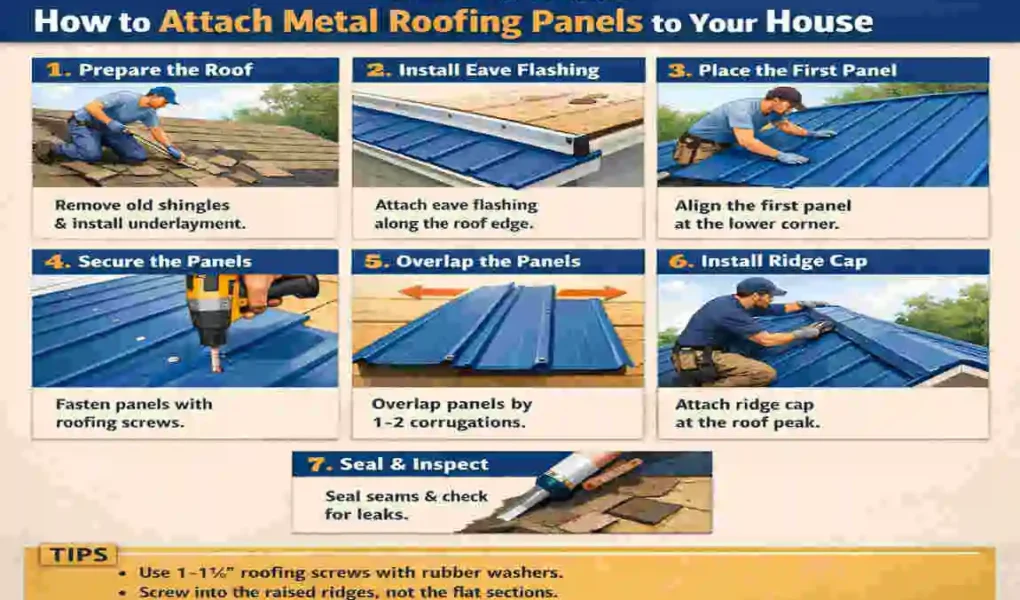
| 1. Prep Roof | Install underlayment, drip edge, chalk lines | Ensure square alignment; 1-2″ eave overhang |
| 2. Position First Panel | Align at eave corner, square to edge | Secure center-first in flat areas (not ribs) with #10 screws |
| 3. Overlap Panels | Nest next panel over first rib, add sealant | Fasten every 12-18″ on laps; work against prevailing wind |
| 4. Secure Fasteners | Use neoprene-washer screws into purlins/deck | Snug only—avoid over-tightening to prevent leaks/cracks |
| 5. Finish Edges | Add ridge cap, flashing at valleys/vents | Overlap caps 6″; seal all penetrations |
Tools & Materials
Before you climb up that ladder, you need to gather every single tool and material you will need. Trust us, there is nothing worse than being halfway through a panel installation and realizing you forgot something critical. Being prepared saves time, money, and a whole lot of frustration.
The Essential Tool Kit
Working on a roof is seriously dangerous. Please do not skip this gear:
- Safety harness with rope and anchor
- Non-slip work boots with soft rubber soles
- Heavy-duty work gloves (metal edges are razor-sharp!)
- Safety glasses to protect from metal shavings
- Knee pads for comfort during long hours
House-Specific Considerations
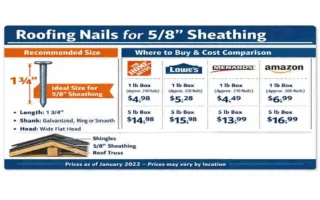
Every home is different. Older homes may have purlins (horizontal supports) rather than solid decking, while newer homes typically feature plywood or OSB decking. Inspect your roof structure carefully before ordering materials. If you have purlins, you will need longer screws that bite into the wood framing. For plywood decking, shorter screws work perfectly.
Fastener Comparison Table
ItemPurposeQuantity (1,000 sq ft roof)
Roofing screws Secure panels to deck 500-800
Butyl sealant Overlap seals 10 rolls
Drip edge, edge protection, full perimeter
Ridge cap, top seam cover, length of ridge
Closure strips, Ridge & eave seals, Perimeter pieces
Preparation Steps
Preparation is where most DIY projects succeed or fail. Skip this part, and you will pay for it later with leaks, buckled panels, or wasted materials. Take your time here, and the actual installation will go much smoother.
Start With a Thorough Roof Inspection
Climb up and walk your roof (carefully, with a harness). Look for sagging areas, soft spots, or rot in the decking. Push on any suspicious spots with a screwdriver. If it sinks in, that section needs to be replaced. Never install metal panels over damaged decking, or your beautiful new roof will have problems within months.
Check that your roof is square by measuring both diagonals from corner to corner. These measurements should be identical (or within 0.5 inches of each other). If they are off, you will need to make adjustments during installation to keep your panels straight.
Repair and Prep the Decking
Replace any damaged plywood sheets. Sweep the entire surface clean of debris, old nails, and leftover roofing materials. Any bumps or protrusions will telegraph through your new metal panels, creating ugly dimples.
Install Quality Underlayment
Lay down a synthetic underlayment or roofing membrane across the entire roof deck. This creates a critical moisture barrier between your wood and the metal panels. Overlap each row by at least 4 inches, and secure with cap nails every 12 inches. Synthetic underlayment is superior to traditional felt because it resists tearing, repels water better, and lasts much longer.
Install Drip Edge Flashing
Attach drip edge flashing along all eaves (the lower edges) before you start laying panels. This flashing channels water away from your fascia boards, preventing rot. Secure it with roofing nails at 8 to 10-inch intervals.
Snap Chalk Lines for Alignment
Using your chalk line, snap reference lines across the roof at intervals matching your panel width. These lines serve as your guide for keeping every panel perfectly aligned. Even a tiny misalignment at the start will turn into a massive crooked problem by the time you reach the other side.
Plan Your Starting Point and Direction
Always start installing panels on the downwind side of the roof. This way, prevailing winds push against the overlaps rather than trying to pry them open. Plan for a 1 to 2 inch overhang at the eaves so water drips properly into your gutters.
Account for Dormers, Skylights, and Vents
Walk around your roof and identify every penetration: chimneys, plumbing vents, skylights, dormers, and attic vents. Measure their locations carefully and sketch a layout plan. Addressing these obstacles early prevents major headaches once panels are in place.
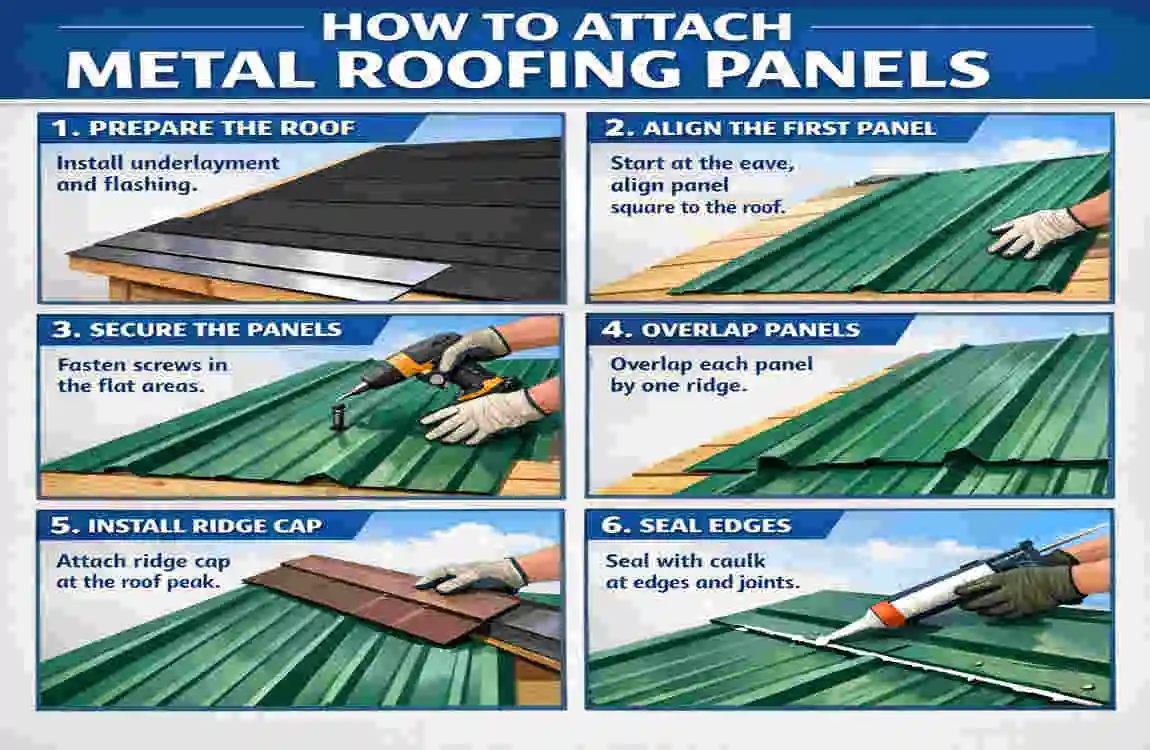
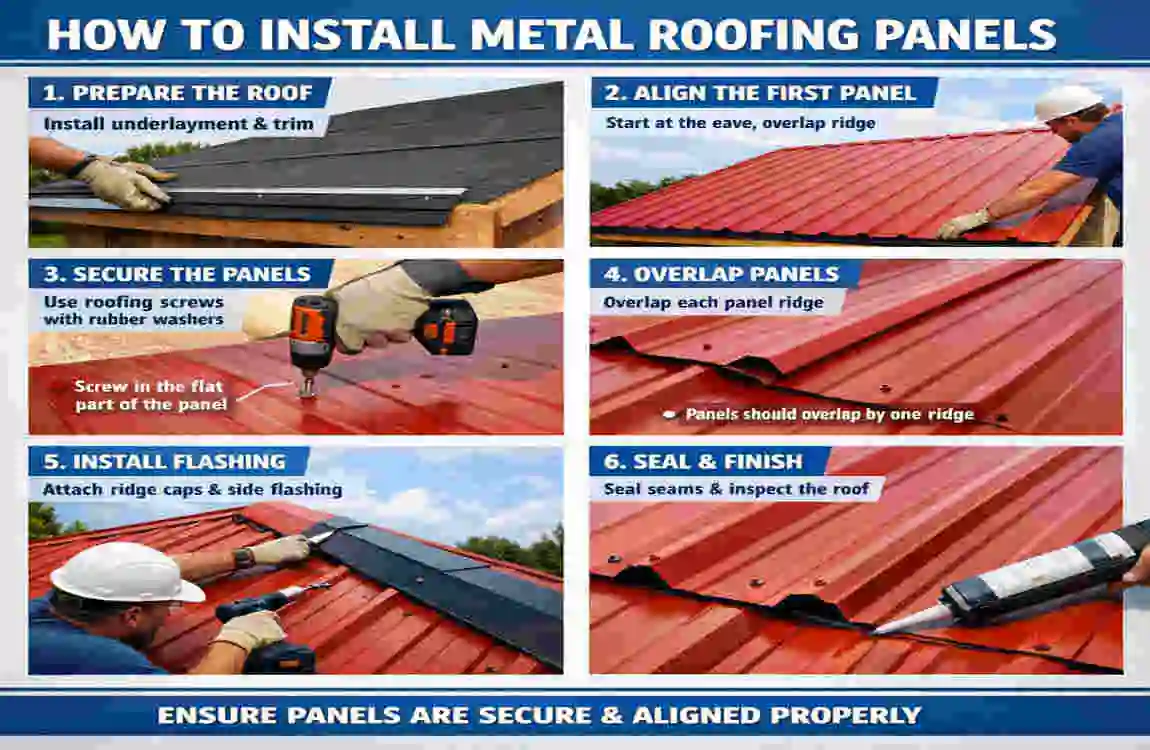
Step-by-Step Installation
This is the heart of your project! We have broken the installation into five manageable phases. Take your time with each one, double-check your work, and do not rush. Remember, a roof that takes an extra day to install correctly is far better than one that leaks in the first rainstorm.
Phase 1: Start the First Panel
Your first panel sets the tone for the entire roof, so this step is absolutely critical. Getting it right means every panel after it falls into place beautifully.
Align at the Eave Corner
Position your first panel at the bottom corner of your roof, on the downwind side. Allow for a 1 to 2 inch overhang past the drip edge so water flows into the gutter instead of wicking back under the panel.
Square to the Edge
Use your chalk lines and a framing square to make sure the panel is perfectly perpendicular to the eave. If your first panel is even slightly tilted, every subsequent panel will magnify that error. Take 5 extra minutes here to save hours of frustration later.
Fasten Center-First in the Flats
Here is a pro tip many beginners miss: always drive screws into the flat portions of the panel, not the raised ribs. Screwing through ribs can crush them, leading to leaks. Start fastening from the center of the panel and work outward to prevent the metal from buckling or wavering.
Space your screws every 12 to 18 inches along each purlin or every 24 inches across the decking. Tighten each screw until the neoprene washer is compressed but still visible. Over-tightening crushes the washer and causes leaks.
Overlap and Secure Subsequent Panels
Now that your first panel is locked in, you are ready to work across the roof. This phase is repetitive, but each panel requires attention to detail.
Apply Butyl Sealant to the Overlap Rib
Before laying the next panel, run a strip of butyl sealant tape along the overlap rib of your first panel. This creates a watertight seal between panels. Skipping this step is one of the top causes of leaky metal roofs.
Next the Next Panel Over the Rib
Lift your second panel and carefully lower it so its edge rib overlaps the first panel’s rib. The panels should “nest” together snugly, with no gaps. Double-check that the bottom edge aligns with the first panel’s bottom edge before fastening.
Follow the Screw Pattern
Screw the second panel following the same pattern as the first: flats only, center-first, working outward. At the overlap seam, place screws every 12 to 18 inches to compress the butyl sealant and create a permanent, waterproof bond.
Check Alignment After Every Few Panels
After installing every third or fourth panel, step back and visually check alignment. Measure from the bottom of your current panel to the eave to confirm the overhang remains consistent. Small drifts are easy to correct early, nearly impossible to fix later.
Cut Panels When Needed
When you reach the end of a row and need a narrower panel, use tin snips or electric shears to cut cleanly. Sweep up all metal shavings immediately, as leaving them on the panels can cause rust spots within days.
Handle Valleys and Penetrations
Valleys and penetrations are where most roofs spring leaks, so extra care here pays off for decades.
Install Valley Flashing First
Before running panels into a valley, install W-valley flashing down the full length of the valley. This flashing directs water safely down to the gutters without letting it seep between panels.
Cut Panels to Match Valley Angles
As you reach the valley, measure and cut each panel at the correct angle to meet the flashing. Leave a small gap (about 1/2 inch), so water has a clear channel to flow.
Install Flashing Around Vents and Chimneys
For plumbing vents, use rubber pipe boots designed for metal roofing. Slide the boot over the vent, trim to fit around the panel’s ribs, and seal with high-quality polyurethane sealant. For chimneys, install step flashing and counter-flashing, ensuring the counter-flashing tucks into the chimney’s mortar joints.
Seal Every Connection
Use a generous bead of roofing sealant around every penetration. Inspect each flashing connection before moving on.
Finish the Ridge and Edges
You are almost done! The ridge (the peak of your roof) is the final major seam.
Install Closure Strips
Place foam closure strips along the ridge on top of your panels. These foam pieces match the panel profile exactly, sealing out insects, dust, and wind-driven rain.
Position the Ridge Cap
Lower the ridge cap over the closure strips. If your roof requires multiple ridge cap pieces, overlap them by a full 6 inches in the direction of prevailing winds.
Fasten the Ridge Cap
Drive screws through the ridge cap, into the panels below, and into the ridge board beneath. Space screws every 12 to 16 inches along both sides of the ridge cap.
Finish the Gable Ends
Install gable trim (also called rake trim) along the sloped side edges of your roof. This trim covers the cut edges of your panels and adds a finished, professional look to your installation.
Final Screw Check
Walk the entire roof and inspect every screw. Any missing, crooked, or overdriven screws should be corrected now.
Expansion Joints for Long Runs
If your roof has panel runs longer than 30 feet, you must plan for thermal expansion. Metal expands and contracts significantly with temperature swings, and ignoring this can cause serious buckling.
Why Expansion Joints Matter
Steel panels can expand nearly 1/2 inch over a 40-foot length between summer heat and winter cold. Without expansion joints, this movement gets concentrated at screws, potentially elongating the holes and causing leaks.
How to install Them
For panels over 30 feet long, use slotted screw holes in the upper portions of the panel. This allows the metal to slide slightly as it expands. Alternatively, install a horizontal expansion joint flashing that lets two shorter panel sections meet with room to move.
Anchor Points Matter
Anchor the panel firmly at the eave (bottom) end, and let the upper end “float” using slotted holes. This approach mimics how professional standing-seam systems handle thermal movement.
Temperature Considerations for Installation Day
Try to install on a mild day (60-75°F) if possible. Installing on extremely hot days means the metal is already expanded, and it will contract significantly in winter. Installing on very cold days creates the opposite problem.
Common Mistakes to Avoid
Even careful DIYers make mistakes. Here are the biggest pitfalls and how to dodge them.
Over-Tightening Screws
The most common rookie mistake! When you over-tighten, the neoprene washer squishes out completely, breaks down faster, and creates a crater in the panel. The fix: Tighten just until the washer compresses flush with the screw head, then stop.
Poor Panel Overlaps
Forgetting sealant tape or not overlapping panels enough leads to leaks within the first year. The fix: Always apply butyl tape at every overlap, and ensure ribs nest completely.
Ignoring Thermal Expansion
Skipping expansion considerations on long runs causes panels to buckle in summer heat. The fix: Follow the manufacturer’s guidelines for slotted holes and expansion joints.
Leaving Metal Shavings Behind
Those tiny bits of metal from cutting will rust quickly, staining your beautiful new roof. The fix: Sweep the roof at the end of every work session with a soft-bristled broom.
Starting on the Wrong Side
Starting on the windward side means the wind pushes into your panel overlaps, increasing leak risk. The fix: Always start on the downwind side of the roof.
Skipping the Manufacturer’s Instructions
Every metal roofing product has specific installation requirements. Ignoring them voids your warranty and invites problems. The fix: Read the instructions thoroughly before starting, and keep them handy during installation.
Finishing & Maintenance
Congratulations! Your metal roof is installed. But we are not quite finished yet. The final touches and ongoing maintenance determine how long your roof will last.
Install Finishing Trim
Add any remaining trim pieces, including rake trim, eave trim, and transition flashing, where two roof sections meet. Clean trim installation makes the difference between an amateur-looking job and a professional-grade roof.
Inspect Seals and Connections
Walk the roof and inspect every screw, every overlap, and every flashing point. Apply additional sealant to any gaps or potential weak points.
Annual Maintenance Schedule
Plan to inspect your roof at least once per year, ideally in spring after winter storms. Look for loose screws, damaged sealant, and debris buildup in valleys.
Longevity Tips
- Avoid walking on panels whenever possible, and step only on the flat portions near screws when you must.
- Touch up paint scratches promptly with matching manufacturer paint to prevent rust.
- Clear debris, such as leaves and branches, before they trap moisture against the metal.
- Trim overhanging branches to prevent scratches and falling limb damage.
With proper care, your metal roof will easily outlast its 40 to 70-year rated lifespan.
FAQs
How far apart should I space screws when attaching metal roofing panels? Most manufacturers recommend 12 to 24 inches between screws, depending on wind zone and panel type. Always check your specific product’s guidelines.
Can I install metal roofing over existing shingles? Yes, with caveats. You will need to install purlins or a ventilated underlayment system first, and local building codes must permit it. Installing over rotten or uneven shingles is never a good idea.
How long does it take to DIY a 2,000-square-foot house? Most DIYers complete a 2,000-square-foot roof in 2 to 3 days with one or two helpers. Complex roofs with many penetrations can take longer.
Do metal roofs attract lightning? No! This is a total myth. Metal roofs do not attract lightning and, because they are non-combustible, actually make your home safer.
Are metal roofs noisy in the rain? With proper underlayment and attic insulation, modern metal roofs are no louder than asphalt shingle roofs.
Can I install metal panels in cold weather? Yes, but mild temperatures (60-75°F) are ideal for handling and sealant performance.
Related Posts